How to implement extent report for parallel testing (multi-threading browser) using selenium and java
The benefits of using extent report for parallel testing (multi-threading browser) are as follows:
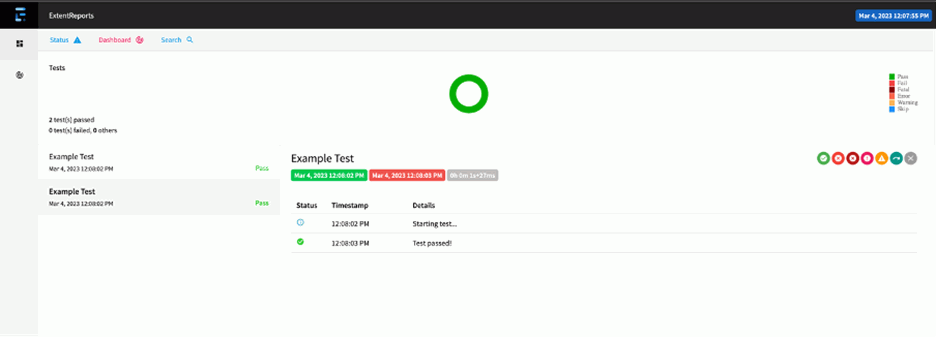
Detailed test reports: Extent Reports provide detailed test reports that include information about test steps, status, screenshots, and logs. These reports can help you quickly identify and debug issues in your test suite.

Parallel execution: Extent Reports support parallel execution, which means you can run multiple tests in parallel across multiple browsers and platforms. This can significantly reduce the overall test execution time.
Real-time updates: Extent Reports provide real-time updates as the tests are executed. This means you can monitor the test execution progress and quickly identify any failures or issues.
Integration with other tools: Extent Reports can be easily integrated with other tools such as TestNG, JUnit, and Jenkins. This can help you automate your test suite and integrate it with your Continuous Integration (CI) pipeline.
Customization: Extent Reports provide a wide range of customization options such as themes, logos, and fonts. This means you can tailor the reports to match your brand or project requirements.
Historical trend analysis: Extent Reports provide historical trend analysis that can help you identify patterns and trends in your test suite. This can help you make informed decisions about the quality of your application and the effectiveness of your testing efforts.
Email and PDF reports: Extent Reports provide options to generate email and PDF reports. This means you can easily share the test reports with stakeholders and team members.
To implement Extent Report for multi-threading browser testing using Java, you can follow these steps:
Step 1: Add the Extent Report and TestNG dependencies to your project. You can add them to your pom.xml file if you’re using Maven or add them to your build path if you’re using a different build tool.
<dependency>
<groupId>com.aventstack</groupId>
<artifactId>extentreports</artifactId>
<version>5.0.7</version>
</dependency>
 <dependency>
<groupId>org.testng</groupId>
<artifactId>testng</artifactId>
<version>7.4.0</version>
</dependency>
Step 2: Create a BaseTest class that initializes the Extent Report and sets up the test configuration.
import com.aventstack.extentreports.ExtentReports;
import com.aventstack.extentreports.reporter.ExtentHtmlReporter;
import org.testng.ITestContext;
import org.testng.annotations.AfterSuite;
import org.testng.annotations.BeforeSuite;

public class BaseTest {
protected static ExtentReports extent;

@BeforeSuite
public void setUp(ITestContext context) {
String reportName = context.getSuite().getName() + " Test Report";
String reportPath = System.getProperty("user.dir") + "/test-output/" + reportName + ".html";

ExtentHtmlReporter htmlReporter = new ExtentHtmlReporter(reportPath);
extent = new ExtentReports();
extent.attachReporter(htmlReporter);

extent.setSystemInfo("Host Name", "localhost");
extent.setSystemInfo("Environment", "QA");
extent.setSystemInfo("User Name", System.getProperty("user.name"));
}

@AfterSuite
public void tearDown() {
extent.flush();
}
}
Step 3: Create a ThreadLocal instance of the ExtentTest class to ensure that each thread has its own test instance.
import com.aventstack.extentreports.ExtentTest;
import com.aventstack.extentreports.Status;

public class ThreadLocalExtentTest {
private static ThreadLocal extentTest = new ThreadLocal<>();

public static ExtentTest getTest() {
return extentTest.get();
}

public static void setTest(ExtentTest test) {
extentTest.set(test);
}

public static void log(Status status, String message) {
extentTest.get().log(status, message);
}
}
Step 4: Create your test classes that extend the BaseTest class and define your test methods.
import org.openqa.selenium.WebDriver;
import org.openqa.selenium.chrome.ChromeDriver;
import org.testng.annotations.*;

public class ExampleTest extends BaseTest {
private WebDriver driver;

@BeforeMethod
public void setUp() {
driver = new ChromeDriver();
}

@AfterMethod
public void tearDown() {
driver.quit();
}

@Test
public void exampleTest() {
ThreadLocalExtentTest.setTest(extent.createTest("Example Test"));

ThreadLocalExtentTest.log(Status.INFO, "Starting test...");

driver.get("https://www.example.com");

ThreadLocalExtentTest.log(Status.PASS, "Test passed!");
}
}
Step 5: Configure TestNG to run your tests in parallel. You can do this by adding the parallel attribute to your TestNG suite file or by setting it programmatically in your testng.xml file or your @Test annotation.
<suite name="Test Suite" parallel="tests" thread-count="2">
	<test name="Test 1">
	<classes>
        	<class name="packagename.ExampleTest"/>
    	</classes>
	</test>
	<test name="Test 2">
	<classes>
        	<class name="packagename.ExampleTest"/>
    	</classes>
	</test>
   </suite>