
Selenium WebDriver
Benefits of Selenium
Four components of Selenium
Difference b/w Selenium IDE, RC & WebDriver
Selenium WebDriver Architecture
Background when user execute selenium code
Download and Install Java
Download and Install Eclipse
Download Selenium WebDriver
Selenium WebDriver Locators
Selenium - Launch Browser
Selenium WebDriver Waits
Selenium- Implicit wait
Selenium- Explicit wait
Selenium- Fluent wait
Selenium- Commonly used commands
Selenium- findElement & findElements
Selenium- Selenium-Handling check Box
Selenium- Handling Radio button
Selenium- Handling drop down
Selenium- Take Screenshot
Selenium- Handle Web Alerts
Selenium- Multiple Windows Handling
Selenium- Handle iframes
Selenium- Upload a file
Selenium- Download a file
Selenium- Actions Class Utilities
Selenium- Mouse Actions
Selenium- Keyboards Events
Selenium- Handle mouse hover Actions
Selenium- Drag and Drop
Selenium- Scroll a WebPage
Selenium- Context Click / Right Click
Selenium- Double Click
Selenium- Desired Capabilities
Selenium- Assertions
Selenium- Exceptions and Exception Handling
Selenium- Difference b/w driver.close() & driver.quit()
Selenium- difference b/w driver.get() & driver.navigate()
Selenium- JavascriptExecutor
Selenium- Read excel file using Fillo API
Selenium- Database Testing using Selenium
Selenium- Read & write excel file using Apache POI
Selenium- Read and Write csv file in Selenium
Selenium- Dynamic Web Table Handling
Selenium- Maven Integration with Selenium
Selenium- Set up Logging using Log4j
Selenium-Implement Extent Report
How to implement Extent Report in Selenium Automation project ?
In this tutorials we will learn about everything about how to integrate Extent Report in Selenium Automation Project .
Selenium provide inbuilt html reports if we use testing frameworks like testNG and Junit. TestNG generates html reports but they are not more readable and interactive .
So we can use Extent Report for more readable and interactive reports by ding some basic configurations.
Lets understand how can we implement Extent report in our Selenium Test Automation Project.

What is Extent Reports?
Extent Reports is an open-source HTML reporting library useful for test automation.
It can be easily integrated with major testing frameworks like JUnit, NUnit, TestNG, etc
Extent reports generate HTML reports showing results with charts like pie charts.
In Extent report , each test step can be associated with a screenshot.
Extent reports also shows total execution time and time taken by each test cases as well.
Extent Reports in Selenium contain two classes which we used
- ExtentReports class
- ExtentTest class
And there are few methods of these classes can be used during implementation
startTest : Executes preconditions of a test case
endTest: Executes postconditions of a test case
Log: Logs the status of each test step onto the HTML report being generated
Flush: Erases any previous data on a relevant report and creates a whole new report
How to implement Extent Report in Selenium Automation Project
Prerequisites:
Below are few prerequisites required for using extent Reports
- Java should be installed on machine
- TestNG plugin on IDE
- extent-config.xml (where we can set few configurations of the report )
- Extent Report Jars or can add dependency in pom.xml
Steps to be followed for Extent Report implementation
- Create a Maven Project .
- Add required dependencies in pom.xml for Extent Report implementation (Jars can be downloaded if it is not a maven project)
Selenium :
<dependency>
  <groupId>org.seleniumhq.selenium</groupId>
  <artifactId>selenium-java</artifactId>
  <version>3.141.59</version>
</dependency>
WebDriverManager:
<!-- https://mvnrepository.com/artifact/io.github.bonigarcia/webdrivermanager -->
<dependency>
  <groupId>io.github.bonigarcia</groupId>
  <artifactId>webdrivermanager</artifactId>
  <version>4.2.2</version>
</dependency>
TestNg:
  <!-- https://mvnrepository.com/artifact/org.testng/testng -->
<dependency>
  <groupId>org.testng</groupId>
  <artifactId>testng</artifactId>
  <version>6.8</version>
</dependency>
Extent Report Dependency:
 <!-- https://mvnrepository.com/artifact/com.relevantcodes/extentreports -->
<dependency>
  <groupId>com.relevantcodes</groupId>
  <artifactId>extentreports</artifactId>
  <version>2.41.2</version>
</dependency>
Create ExtentReportTest class and add below code in that, I have added comment wherever required
package MyFirstMavenProject.MavenProject;

import java.io.File;

import org.testng.Assert;
import org.testng.ITestResult;
import org.testng.SkipException;
import org.testng.annotations.AfterMethod;
import org.testng.annotations.AfterTest;
import org.testng.annotations.BeforeTest;
import org.testng.annotations.Test;

import com.relevantcodes.extentreports.ExtentReports;
import com.relevantcodes.extentreports.ExtentTest;
import com.relevantcodes.extentreports.LogStatus;

public class ExtentReportTest {

	ExtentReports extentReport;
	ExtentTest extentTest;

	@BeforeTest
	public void startTestReport() {

		// initialize ExtentReport by passing path where we store ExtentReport
		// and second parameter is Boolean replaceExting
		// replaceExting = true (new report will replace existing report)
		extentReport = new ExtentReports(System.getProperty("user.dir") + "/test-output/Extent.html", true);

		extentReport.loadConfig(
				new File(System.getProperty("user.dir") + "src/main/java/com/config/extentReportConfig.xml"));

		// To add system or environment info by using the setSystemInfo method.
		extentReport.addSystemInfo("Host Name", "Tutorials Hut");
		extentReport.addSystemInfo("User Name", "tutorialshutuser");
		extentReport.addSystemInfo("Environment", "QA");

		// Allows performing configuration and customization to the HTML report
		// from local resource as mentioned in the 'extent-config.xml'
		extentReport.loadConfig(new File(System.getProperty("user.dir") + "\\extent-config.xml"));
	}

	@Test
	public void firstTestCase() {

		// Calling startTest() generates a toggle for the test in the HTML file
		// and adds all log events under this level.
		// startTest(java.lang.String testName)
		extentTest = extentReport.startTest("FirstTestCase");
		Assert.assertTrue(true);
		// writing the log for first test case in the report
		extentTest.log(LogStatus.PASS, "FirstTestCase is passed");
	}

	@Test
	public void secondTestCase() {
		extentTest = extentReport.startTest("secondTestCase");
		Assert.assertTrue(false);
		extentTest.log(LogStatus.FAIL, "secondTestCase is failed");
	}

	@Test
	public void thirdTestCase() {
		extentTest = extentReport.startTest("thirdTestCase");
		throw new SkipException("thirdTestCase is skipped");
	}

	@AfterMethod
	public void getResult(ITestResult result) {
		if (result.getStatus() == ITestResult.FAILURE) {
			extentTest.log(LogStatus.FAIL, "Test Case Failed is " + result.getName());
			extentTest.log(LogStatus.FAIL, "Test Case Failed is " + result.getThrowable());
		} else if (result.getStatus() == ITestResult.SKIP) {
			extentTest.log(LogStatus.SKIP, "Test Case Skipped is " + result.getName());
		}

		// ends the current test and prepares to create HTML report
		extentReport.endTest(extentTest);
	}

	@AfterTest
	public void endTestReport() {

		// Appends the HTML file with all the ended tests. There
		extentReport.flush();

		// Closes the underlying stream and clears all resources
		extentReport.close();
	}

}
3) Create a ‘extent-config.xml’ file and add below set of code in that
<?xml version="1.0" encoding="UTF-8"?>
<extentreports>
<configuration>
 <!-- report theme -->
<!-- standard, dark -->
<theme>standard</theme>

 <!-- document encoding -->
 <!-- defaults to UTF-8 -->
<encoding>UTF-8</encoding>

<!-- protocol for script and stylesheets -->
 <!-- defaults to https -->
<protocol>https</protocol>

<!-- title of the document -->
<documentTitle>ExtentReports 2.0</documentTitle>

<!-- report name - displayed at top-nav -->
<reportName></reportName>

<!-- report headline - displayed at top-nav, after reportHeadline -->
<reportHeadline>Automation Report</reportHeadline>

<!-- global date format override -->
<!-- defaults to yyyy-MM-dd -->
<dateFormat>yyyy-MM-dd</dateFormat>

<!-- global time format override -->
<!-- defaults to HH:mm:ss -->
<timeFormat>HH:mm:ss</timeFormat>

<!-- custom javascript -->
   <scripts>
      <![CDATA[
      $(document).ready(function() {
          });
        ]]>
</scripts>
<!-- custom styles -->
 <styles>
    <![CDATA[
]]>

</styles>
 </configuration>
</extentreports>
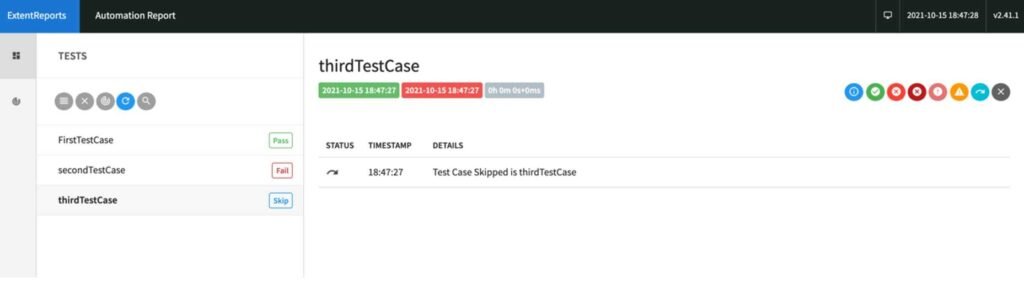
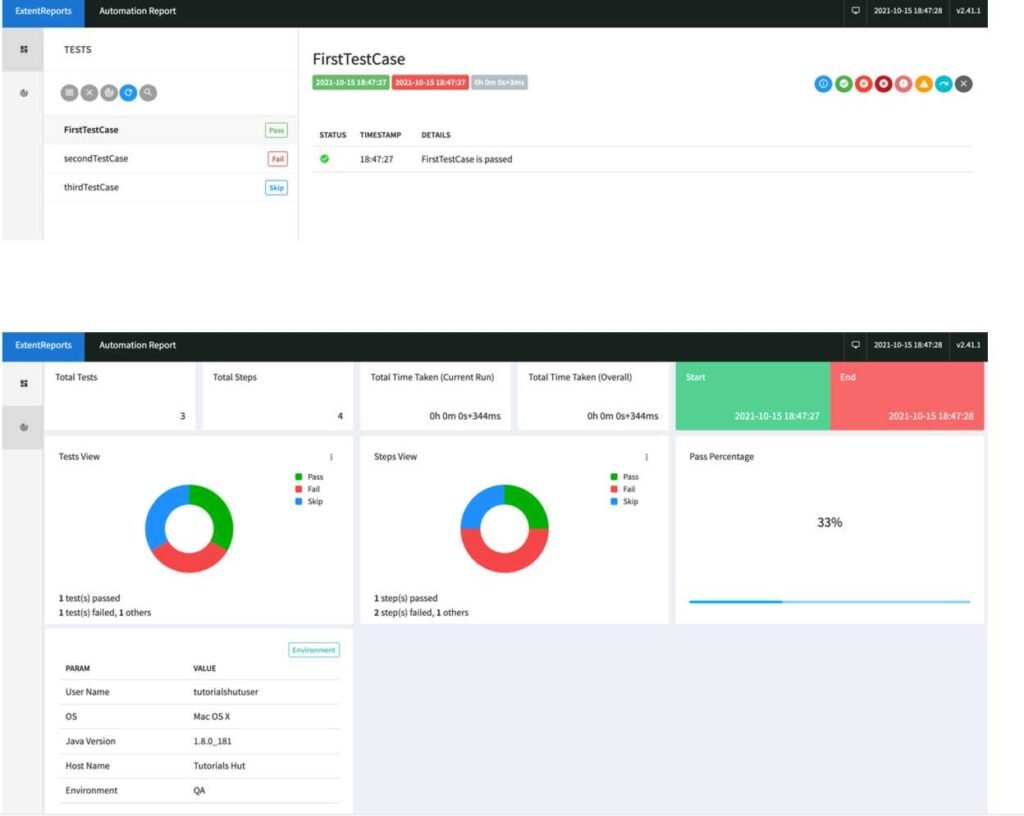
4)Run Class ExtentReportTest as TestNg test and below is the test case status

5) As per the report path mentioned in above code ,open Extent.html report stored in test-output folder. below are few screenshots of the generated report
6) If there is a requirement where we have to add evidence of the failed test cases then we have to modify the code like below and replace below methods
@AfterMethod
	public void getResult(ITestResult result) {
		if (result.getStatus() == ITestResult.FAILURE) {
			extentTest.log(LogStatus.FAIL, "Test Case Failed is " + result.getName());
			extentTest.log(LogStatus.FAIL, "Test Case Failed is " + result.getThrowable());
			String screenshotPath=getScreenshot(driver,result.getName());
        extentTest.log(LogStatus.FAIL, extentTest.addScreenCapture("path of screenshot need to be stored"));

		} else if (result.getStatus() == ITestResult.SKIP) {
			extentTest.log(LogStatus.SKIP, "Test Case Skipped is " + result.getName());
		}

		// ends the current test and prepares to create HTML report
		extentReport.endTest(extentTest);
	}

	public  String getScreenshot(WebDriver driver,String screenshotName) throws IOException{
		String dateName=new SimpleDateFormat("yyyyMMddhhmmss").format(new Date());
				TakesScreenshot ts=(TakesScreenshot)driver;
				File source =ts.getScreenshotAs(OutputType.FILE);

				String destination =System.getProperty("user.dir")+"/screenshots/"+screenshotName+"_"+dateName+".jpeg";

				File finalDestination=new File(destination);
				FileUtils.copyFile(source, finalDestination);
				return destination;

	}
Recommended Articles
- Selenium- Read excel file using Fillo API
- Selenium- Database Testing using Selenium
- Selenium- Read & write excel file using Apache POI
- Selenium- Read and Write csv file in Selenium
- Selenium- difference b/w driver.get() & driver.navigate()
- Selenium- findElement & findElements
- Difference b/w Selenium IDE, RC & WebDriver
Selenium WebDriver Tutorials
Benefits of Selenium
Four components of Selenium
Difference b/w Selenium IDE, RC & WebDriver
Selenium WebDriver Architecture
Background when user execute selenium code
Download and Install Java
Download and Install Eclipse
Download Selenium WebDriver
Selenium WebDriver Locators
Selenium - Launch Browser
Selenium WebDriver Waits
Selenium- Implicit wait
Selenium- Explicit wait
Selenium- Fluent wait
Selenium- Commonly used commands
Selenium- findElement & findElements
Selenium- Selenium-Handling check Box
Selenium- Handling Radio button
Selenium- Handling drop down
Selenium- Take Screenshot
Selenium- Handle Web Alerts
Selenium- Multiple Windows Handling
Selenium- Handle iframes
Selenium- Upload a file
Selenium- Download a file
Selenium- Actions Class Utilities
Selenium- Mouse Actions
Selenium- Keyboards Events
Selenium- Handle mouse hover Actions
Selenium- Drag and Drop
Selenium- Scroll a WebPage
Selenium- Context Click / Right Click
Selenium- Double Click
Selenium- Desired Capabilities
Selenium- Assertions
Selenium- Exceptions and Exception Handling
Selenium- Difference b/w driver.close() & driver.quit()
Selenium- difference b/w driver.get() & driver.navigate()
Selenium- JavascriptExecutor
Selenium- Read excel file using Fillo API
Selenium- Database Testing using Selenium
Selenium- Read & write excel file using Apache POI
Selenium- Read and Write csv file in Selenium
Selenium- Dynamic Web Table Handling
Selenium- Maven Integration with Selenium
Selenium- Set up Logging using Log4j
Selenium-Implement Extent Report