
Selenium WebDriver
Benefits of Selenium
Four components of Selenium
Difference b/w Selenium IDE, RC & WebDriver
Selenium WebDriver Architecture
Background when user execute selenium code
Download and Install Java
Download and Install Eclipse
Download Selenium WebDriver
Selenium WebDriver Locators
Selenium - Launch Browser
Selenium WebDriver Waits
Selenium- Implicit wait
Selenium- Explicit wait
Selenium- Fluent wait
Selenium- Commonly used commands
Selenium- findElement & findElements
Selenium- Selenium-Handling check Box
Selenium- Handling Radio button
Selenium- Handling drop down
Selenium- Take Screenshot
Selenium- Handle Web Alerts
Selenium- Multiple Windows Handling
Selenium- Handle iframes
Selenium- Upload a file
Selenium- Download a file
Selenium- Actions Class Utilities
Selenium- Mouse Actions
Selenium- Keyboards Events
Selenium- Handle mouse hover Actions
Selenium- Drag and Drop
Selenium- Scroll a WebPage
Selenium- Context Click / Right Click
Selenium- Double Click
Selenium- Desired Capabilities
Selenium- Assertions
Selenium- Exceptions and Exception Handling
Selenium- Difference b/w driver.close() & driver.quit()
Selenium- difference b/w driver.get() & driver.navigate()
Selenium- JavascriptExecutor
Selenium- Read excel file using Fillo API
Selenium- Database Testing using Selenium
Selenium- Read & write excel file using Apache POI
Selenium- Read and Write csv file in Selenium
Selenium- Dynamic Web Table Handling
Selenium- Maven Integration with Selenium
Selenium- Set up Logging using Log4j
Selenium-Implement Extent Report
Maven Selenium Integration in Selenium Automation Project
In this tutorials we will learn about everything about maven and how to integrate Maven Selenium in Selenium Automation Project so this topic covers below points
-
- What is Maven ?
- Steps to Install Maven on windows PC
- Steps to Install Maven in Eclipse IDE
- Create Maven Project in Eclipse IDE
- Add Project dependency in pom.xml
- Maven Life cycle
- Maven Surefire Plugin
- Maven-compiler-plugin
What is Maven ?
- Maven is Primarily used for building and managing any Java-based project
- Maven is a build management tool where you will be getting the project structure.
- Maven is a powerful tool that is based on the POM (project object model).
- JARS will be imported into the project based on the dependencies which are present in pom.xml file with no headache of manually adding the libraries. Maven requires internet to download the jars, which is a one-time process.
- Maven enables the user to create a well-defined project structure , perform compilation , testing, package and deploy the final product
- You can get the whole project wrapped up as jar or war based on the packaging which you have mentioned in pom file
- xml is a single configuration file that contains the majority of information required to build a project just the way you want.
- We can execute the test scripts in the command line without an eclipse with the help of Maven.
Steps to Install Maven on PC
Below are the steps for maven installation on windows PC
1) Download Apache Maven
2)Navigate to below link and download the zip file mentioned in below screenshot.

2)Unzip the folder which is downloaded in previous step and place it to the C drive, and copy the location of the folder.
3)Open system properties through My Computer and Navigate to ‘Advanced System Settings’.
4)Configure the MAVEN_HOME path as Environment Variable and give path till the bin folder.
5)Verify Maven is installed on machine using cmd.

Steps to Install Maven plugin in Eclipse IDE
Below are the steps for installing Maven plugin in Eclipse IDE
- Open Eclipse and Navigate to Help > Eclipse Marketplace
- Search maven in the search box and install ‘Maven Integration for Eclipse ’ as mentioned in the below screenshot

Once this plugin is installed , you will be able to play with Maven in eclipse .
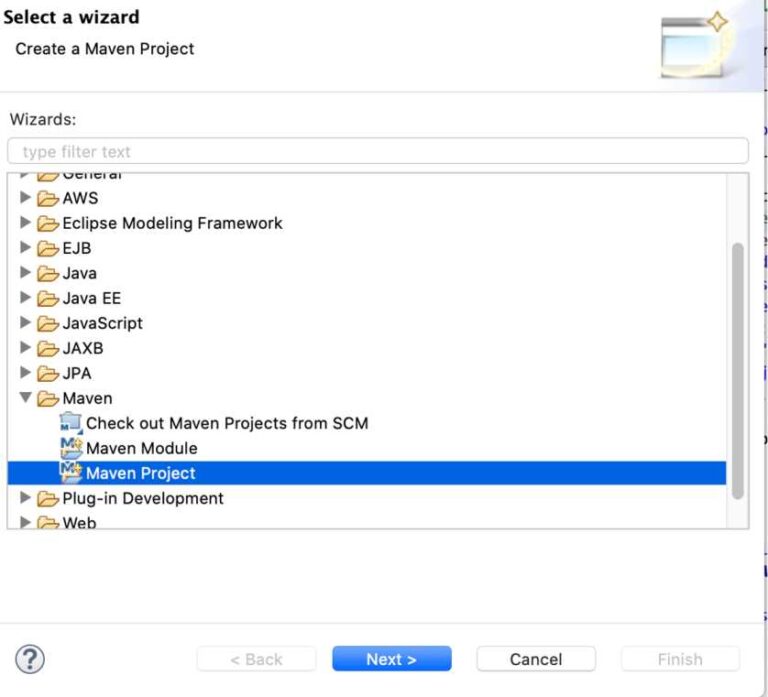
Create Maven Project in Eclipse IDE
You can follow below steps for creating maven Project in eclipse IDE
- Go to the File → New → Project
- Search Maven Folder and click on Maven Project and Click on Next
- Choose any workspace location on your PC and Click on the Next button for the further process
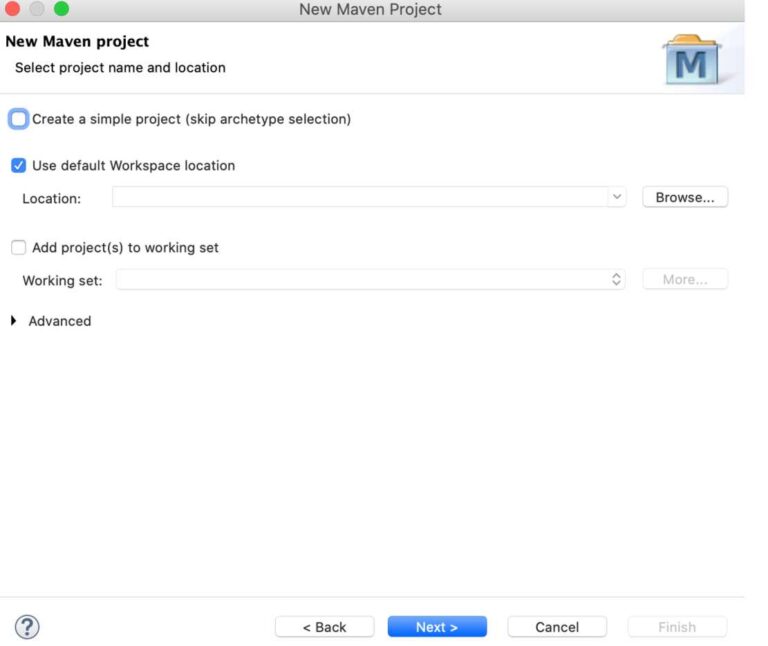
- Click on the Next button without doing anything.
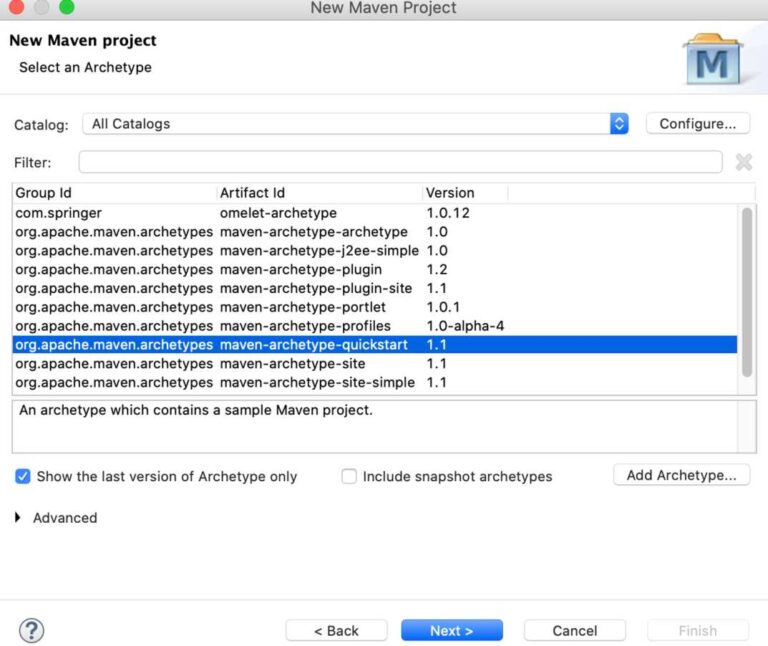
- Provide Group ID and Artifact ID and click on the Finish button as we can see in the below screenshot:

- Once we are done with creating the Maven project, our Maven folder structure will look like this:

Add Project dependency in pom.xml
All the external libraries that are used in a project are called dependencies.
Maven has a feature that automatically downloads required libraries from its central repository so that you don’t need to add in your Project or store locally
Whenever we mention any dependency in pom.xml and save the project then It start downloading the library from central repository and store the library on local in .m2 folder under C drive.
Below are few examples of mentioning dependencies in your pom.xml
Selenium Maven Dependency
<!– https://mvnrepository.com/artifact/org.seleniumhq.selenium/selenium-java –>
<dependency>
<groupId>org.seleniumhq.selenium</groupId>
<artifactId>selenium-java</artifactId>
<version>3.141.59</version>
</dependency>
Log4j dependency
<!-- https://mvnrepository.com/artifact/log4j/log4j -->
<dependency>
  <groupId>log4j</groupId>
  <artifactId>log4j</artifactId>
  <version>1.2.13</version>
</dependency>
The pom.xml will look like below after adding dependency
<project xmlns="http://maven.apache.org/POM/4.0.0" xmlns:xsi="http://www.w3.org/2001/XMLSchema-instance"
xsi:schemaLocation="http://maven.apache.org/POM/4.0.0 http://maven.apache.org/xsd/maven-4.0.0.xsd">
<modelVersion>4.0.0</modelVersion>
<groupId>MyFirstMavenProject</groupId>
<artifactId>MavenProject</artifactId>
<version>0.0.1-SNAPSHOT</version>
<packaging>jar</packaging>
<name>MavenProject</name>
<url>http://maven.apache.org</url>
<properties>
   <project.build.sourceEncoding>UTF-8</project.build.sourceEncoding>

       </properties>

  <dependencies>

              <!-- https://mvnrepository.com/artifact/log4j/log4j -->

              <!-- https://mvnrepository.com/artifact/org.seleniumhq.selenium/selenium-java -->

<dependency>
    <groupId>org.seleniumhq.selenium</groupId>
    <artifactId>selenium-java</artifactId>
    <version>3.14.0</version>
</dependency>

 <dependency>
       <groupId>log4j</groupId>
       <artifactId>log4j</artifactId>
       <version>1.2.13</version>
</dependency>

  </dependencies>
</project>
Maven Life cycle
Default Maven lifecycle has 8 steps:
Validate, Compile, Test, Package, Integration test, Verify, Install and Deploy
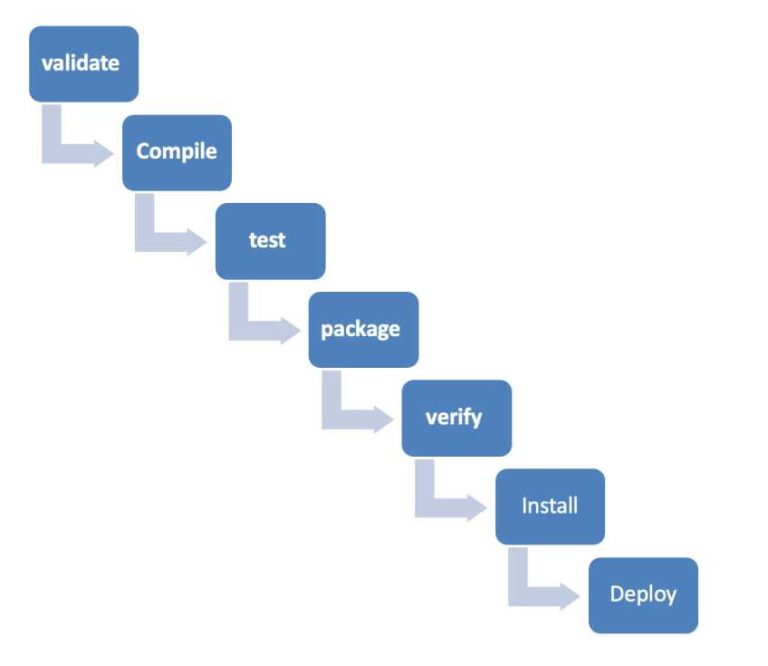
- validate – validate the project is correct and all necessary information is available
- compile – compile the source code of the project
- test – test the compiled source code using a suitable unit testing framework. These tests should not require the code be packaged or deployed
- package– take the compiled code and package it in its distributable format, such as a JAR.
- verify– run any checks on results of integration tests to ensure quality criteria are met
- install – install the package into the local repository, for use as a dependency in other projects locally
- deploy– done in the build environment, copies the final package to the remote repository for sharing with other developers and projects.
These lifecycle phases (plus the other lifecycle phases not shown here) are executed sequentially to complete the default lifecycle.
Maven Surefire Plugin
We can execute our test cases using maven Surefire plug-in.
First we need to add testing dependency as well in pom.xml.
<dependency>
    <groupId>org.testng</groupId>
    <artifactId>testng</artifactId>
    <version>6.9.x</version>
    <scope>test</scope>
</dependency>
To configure Surefile Plug-in, we need to add below lines in pom.xml file.
<plugin>
<groupId>org.apache.maven.plugins</groupId>
<artifactId>maven-surefire-plugin</artifactId>
<version>3.0.0-M4</version>

<configuration>
   <suiteXmlFiles>
      <suiteXmlFile>testng.xml</suiteXmlFile>
   </suiteXmlFiles>
</configuration>

</plugin>
So whatever test cases are mentioned in testing.xml file , we can execute these test cases using mvn test command.
Maven-compiler-plugin
Maven Compiler-plugin is used to compile the sources of our project.
The Compiler Plugin has two goals. Both are already bound to their proper phases within the Maven Lifecycle and are therefore, automatically executed during their respective phases.
- compiler:compile is bound to the compile phase and is used to compile the main source files.
- compiler:testCompile is bound to the test-compile phase and is used to compile the test source files
<plugin>
   <groupId>org.apache.maven.plugins</groupId>
   <artifactId>maven-compiler-plugin</artifactId>
   <version>3.5.1</version>
      <configuration>
         <source>${jdk.level}</source>
        <target>${jdk.level}</target>
         </configuration>
</plugin>
We can compile source code using below set of maven commands after adding above plugin.
mvn compile
for compiling the test source we can use
mvn test-compile
Selenium WebDriver Tutorials
Benefits of Selenium
Four components of Selenium
Difference b/w Selenium IDE, RC & WebDriver
Selenium WebDriver Architecture
Background when user execute selenium code
Download and Install Java
Download and Install Eclipse
Download Selenium WebDriver
Selenium WebDriver Locators
Selenium - Launch Browser
Selenium WebDriver Waits
Selenium- Implicit wait
Selenium- Explicit wait
Selenium- Fluent wait
Selenium- Commonly used commands
Selenium- findElement & findElements
Selenium- Selenium-Handling check Box
Selenium- Handling Radio button
Selenium- Handling drop down
Selenium- Take Screenshot
Selenium- Handle Web Alerts
Selenium- Multiple Windows Handling
Selenium- Handle iframes
Selenium- Upload a file
Selenium- Download a file
Selenium- Actions Class Utilities
Selenium- Mouse Actions
Selenium- Keyboards Events
Selenium- Handle mouse hover Actions
Selenium- Drag and Drop
Selenium- Scroll a WebPage
Selenium- Context Click / Right Click
Selenium- Double Click
Selenium- Desired Capabilities
Selenium- Assertions
Selenium- Exceptions and Exception Handling
Selenium- Difference b/w driver.close() & driver.quit()
Selenium- difference b/w driver.get() & driver.navigate()
Selenium- JavascriptExecutor
Selenium- Read excel file using Fillo API
Selenium- Database Testing using Selenium
Selenium- Read & write excel file using Apache POI
Selenium- Read and Write csv file in Selenium
Selenium- Dynamic Web Table Handling
Selenium- Maven Integration with Selenium
Selenium- Set up Logging using Log4j
Selenium-Implement Extent Report