
Selenium WebDriver
Benefits of Selenium
Four components of Selenium
Difference b/w Selenium IDE, RC & WebDriver
Selenium WebDriver Architecture
Background when user execute selenium code
Download and Install Java
Download and Install Eclipse
Download Selenium WebDriver
Selenium WebDriver Locators
Selenium - Launch Browser
Selenium WebDriver Waits
Selenium- Implicit wait
Selenium- Explicit wait
Selenium- Fluent wait
Selenium- Commonly used commands
Selenium- findElement & findElements
Selenium- Selenium-Handling check Box
Selenium- Handling Radio button
Selenium- Handling drop down
Selenium- Take Screenshot
Selenium- Handle Web Alerts
Selenium- Multiple Windows Handling
Selenium- Handle iframes
Selenium- Upload a file
Selenium- Download a file
Selenium- Actions Class Utilities
Selenium- Mouse Actions
Selenium- Keyboards Events
Selenium- Handle mouse hover Actions
Selenium- Drag and Drop
Selenium- Scroll a WebPage
Selenium- Context Click / Right Click
Selenium- Double Click
Selenium- Desired Capabilities
Selenium- Assertions
Selenium- Exceptions and Exception Handling
Selenium- Difference b/w driver.close() & driver.quit()
Selenium- difference b/w driver.get() & driver.navigate()
Selenium- JavascriptExecutor
Selenium- Read excel file using Fillo API
Selenium- Database Testing using Selenium
Selenium- Read & write excel file using Apache POI
Selenium- Read and Write csv file in Selenium
Selenium- Dynamic Web Table Handling
Selenium- Maven Integration with Selenium
Selenium- Set up Logging using Log4j
Selenium-Implement Extent Report
Upload a file in Selenium using sendKeys(), AutoIT Tool and Robot Class
This article will present you with a complete idea about how to upload a file in selenium webdriver , there are multiple methods to perform to achieve this task ( Selenium upload file ) so lets understand how we can achieve this.
Files uploading using Selenium can be done with the below methods:
Upload using sendKeys method in Selenium
When you want to upload files locally then you can directly use sendKeys () and give a path in code. However, the same thing will not work remotely.
It is an inbuilt feature for file upload in Selenium.
It directly applies to input tags which have an attribute as type=’file’ ,
For example –
<input type=”file” element
<html>
<body>
<form enctype="multipart/form-data" action="parse_file.php" method="post">
 <p>Browse for a file to upload: </p>
<input type="file" name="uploadsubmit">
<br/><br/>
 <input type="submit" value="SUBMIT">
</form>
</body>
</html>
Syntax
WebElement uploadElement = driver.findElement(By.xpath("***xpath of element/button****"));
uploadElement.sendKeys("D:/work/upload.png");
Lets understand how we can achieve this using below scenario
Steps:
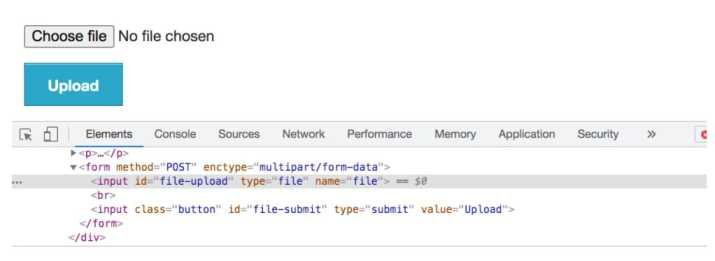
- Inspect the element or the button provided for file upload.
- Using sendKeys, Browse the path where the actual file to be uploaded.
- Paste the path using sendKeys
- Click on the save or submit button and the file will be seen uploaded.
Code implementation
package com.test;

import java.util.concurrent.TimeUnit;

import org.openqa.selenium.*;

import org.openqa.selenium.chrome.ChromeDriver;

public class UploadFile {

public static WebDriver driver;

public static void main(String[] args) {

// Create a new instance of the Chrome driver

System.setProperty("webdriver.chrome.driver", "D:\\Drivers\\chromedriver.exe");

driver = new ChromeDriver();

// Launch the URL

driver.get("URL");

driver.manage().timeouts().implicitlyWait(2, TimeUnit.SECONDS);

// Identify upload button

WebElement uploadElement = driver.findElement(By.id("uploadfile_0"));

// enter the file path onto the file-selection input field

uploadElement.sendKeys("D:\\newFile.pdf");

// click the "UploadFile" button

driver.findElement(By.name("send")).click();

}

}
How to upload using AutoIT tool in Selenium
- AutoIT is a third party tool and an open-source automation tool , It is not provided by selenium.
- AutoIT creates a .exe file and runs only on Windows and basically It is not recommended to use AutoIT for File upload.
- AutoIT is used to automate windows related pop up for example combination of keystrokes, mouse movements, and windows popup
Below are the steps used for writing scripts using AutoIT
1. Download and Install AutoIT using URL https://www.autoitscript.com/site/autoit/downloads/
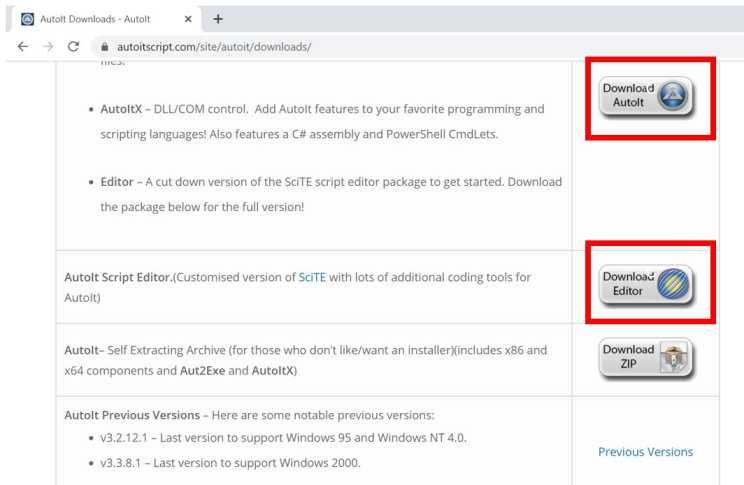
- After download you will get two setup files as shown in below screen, first is AutoIt version 3 setup and second is Scitautoit3 .
- Setup AutoIT using both the files by clicking one by one
- Once It is Installed – open up AutoIT Editor (C:\Program Files (x86)\AutoIt3\SciTE’)
Write below AutoIT scripts in AutoIT editor and save is as ‘UploadFile.au3’
WinWaitActive("File Upload")
Send("D:\UploadFile.pdf")
Send("{ENTER}")

Explanation of Above code
WinWaitActive(“File Upload”) – Changes focus of cursor on the Window popup box to upload file.
below are the parameters used specific to each browser
File Upload – In Firefox
Open – In chrome
File To Upload – In IE
Send(“D:\UploadFile.pdf”) : Give location of the upload file once windows popup is active
Send(“{ENTER}”) : Clicks on Enter to upload a file
6- Convert .au3 file format into .exe format (Right click on the file and click on compile scripts then it will convert and generate .exe file of the same)

7-Use below command for executing the scripts
Runtime.getRuntime().exec("File Path of AutoIt.exe");
package com.test;

import java.util.concurrent.TimeUnit;

import org.openqa.selenium.*;

import org.openqa.selenium.chrome.ChromeDriver;

public class UploadFileUsingAutoIT {

public static WebDriver driver;

public static void main(String[] args) {

// Create a new instance of the Chrome driver

System.setProperty("webdriver.chrome.driver", "D:\\Drivers\\chromedriver.exe");

driver = new ChromeDriver();

// Launch the URL

driver.get("URL");

driver.manage().timeouts().implicitlyWait(2, TimeUnit.SECONDS);

// Identify upload button

WebElement uploadElement = driver.findElement(By.id("uploadfile_0"));

//To click on the 'browse' button

uploadElement.click();

//To call the AutoIt script

Runtime.getRuntime().exec("D:\\AutoIt\\Uploadfile.exe");

//'close' method is used to close the browser window

driver.close();

}

}
Upload using Robot class
Robot class is used for handling the keyboard functions, mouse related functions etc
Below are few examples of methods of Robot class which we will using during upload
keyPress – Press a given key
keyrelease – Releases a given key
Main disadvantage of using Robot class is that Keyboard or mouse related events would only work on the current instance of the window and if any other windows opens during execution then the mouse or keyboard event still remains on the previous window.
Steps:
1)Click on upload File button
driver.findElement(By.xpath(“//*[@id=’uploadfile_0′]”)).click();
2) Copy file location on the clipboard
StringSelection stringSelection = new StringSelection(“D:\\newFile.pdf”);
Clipboard clipboard=Toolkit.getDefaultToolkit().getSystemClipboard();
clipboard.setContents(stringSelection, null);
3) Paste file location into the filename field of the File Upload dialog box //native key strokes for CTRL, V and ENTER keys
Robot robot = new Robot();
robot.keyPress(KeyEvent.VK_CONTROL);
robot.keyPress(KeyEvent.VK_V);
robot.keyRelease(KeyEvent.VK_V);
robot.keyRelease(KeyEvent.VK_CONTROL);
robot.keyPress(KeyEvent.VK_ENTER);
robot.keyRelease(KeyEvent.VK_ENTER);
Code Implementation
public void uploadFileUsingRobot(String fileLocation, WebElement chooseFileButton) {

    try {

    chooseFileButton.click();

     // Setting clipboard with file location

       setClipboardData(fileLocation);

        // native key strokes for CTRL, V and ENTER keys

       Robot robot = null;

        robot = new Robot();

        robot.delay(250);

        robot.keyPress(KeyEvent.VK_ENTER);

        robot.keyRelease(KeyEvent.VK_ENTER);

        robot.delay(2000);

        robot.keyPress(KeyEvent.VK_CONTROL);

        robot.keyPress(KeyEvent.VK_V);

        robot.keyRelease(KeyEvent.VK_V);

        robot.keyRelease(KeyEvent.VK_CONTROL);

        robot.keyPress(KeyEvent.VK_ENTER);

        robot.keyRelease(KeyEvent.VK_ENTER);

        robot.delay(2000);

    } catch (Exception e) {

        e.printStackTrace();

                 }

}

public static void setClipboardData(String string) {

    // StringSelection is a class that can be used for copy and paste operations.

    StringSelection stringSelection = new StringSelection(string);

    Clipboard clipboard=Toolkit.getDefaultToolkit().getSystemClipboard();

    clipboard.setContents(stringSelection, null);

}
Selenium WebDriver Tutorials
Benefits of Selenium
Four components of Selenium
Difference b/w Selenium IDE, RC & WebDriver
Selenium WebDriver Architecture
Background when user execute selenium code
Download and Install Java
Download and Install Eclipse
Download Selenium WebDriver
Selenium WebDriver Locators
Selenium - Launch Browser
Selenium WebDriver Waits
Selenium- Implicit wait
Selenium- Explicit wait
Selenium- Fluent wait
Selenium- Commonly used commands
Selenium- findElement & findElements
Selenium- Selenium-Handling check Box
Selenium- Handling Radio button
Selenium- Handling drop down
Selenium- Take Screenshot
Selenium- Handle Web Alerts
Selenium- Multiple Windows Handling
Selenium- Handle iframes
Selenium- Upload a file
Selenium- Download a file
Selenium- Actions Class Utilities
Selenium- Mouse Actions
Selenium- Keyboards Events
Selenium- Handle mouse hover Actions
Selenium- Drag and Drop
Selenium- Scroll a WebPage
Selenium- Context Click / Right Click
Selenium- Double Click
Selenium- Desired Capabilities
Selenium- Assertions
Selenium- Exceptions and Exception Handling
Selenium- Difference b/w driver.close() & driver.quit()
Selenium- difference b/w driver.get() & driver.navigate()
Selenium- JavascriptExecutor
Selenium- Read excel file using Fillo API
Selenium- Database Testing using Selenium
Selenium- Read & write excel file using Apache POI
Selenium- Read and Write csv file in Selenium
Selenium- Dynamic Web Table Handling
Selenium- Maven Integration with Selenium
Selenium- Set up Logging using Log4j
Selenium-Implement Extent Report
About Author
Nitesh is working as a Quality Analyst with more than 10 years of comprehensive experience in test automation, performance testing , DevOps etc .He likes to share his wealth of knowledge across software test Process